What You’ll Learn
- Setting up post-call automation with conditional logic
- Creating Google Sheets integration for lead tracking
- Configuring data mapping from calls to spreadsheet
- Building a qualified leads database automatically
- Monitoring and optimizing your lead collection process
Prerequisites
- Configured AI assistant with post-call variables
- Google account with Google Sheets access
- Understanding of post-call webhook automation
- Access to call testing functionality
Step 1: Set Up Post-Call Automation Trigger
We’ll start by creating an automation that triggers when a phone call ends.- Navigate to Automation Platform
- Create a new flow from scratch
- Search for your calling platform in the trigger section
- Select “Phone Call Ended” trigger
- This trigger activates when any call to your selected assistant completes
Step 2: Configure Assistant and Load Data
- Select the assistant you want to automate
- Each assistant can only have one “phone call ended” automation
- All calls to this assistant will go through this automation
- Click “Load Data” to set up the webhook and load sample call data
- This automatically configures the webhook on your assistant
- Sample data from your recent calls will be loaded for use in the next steps
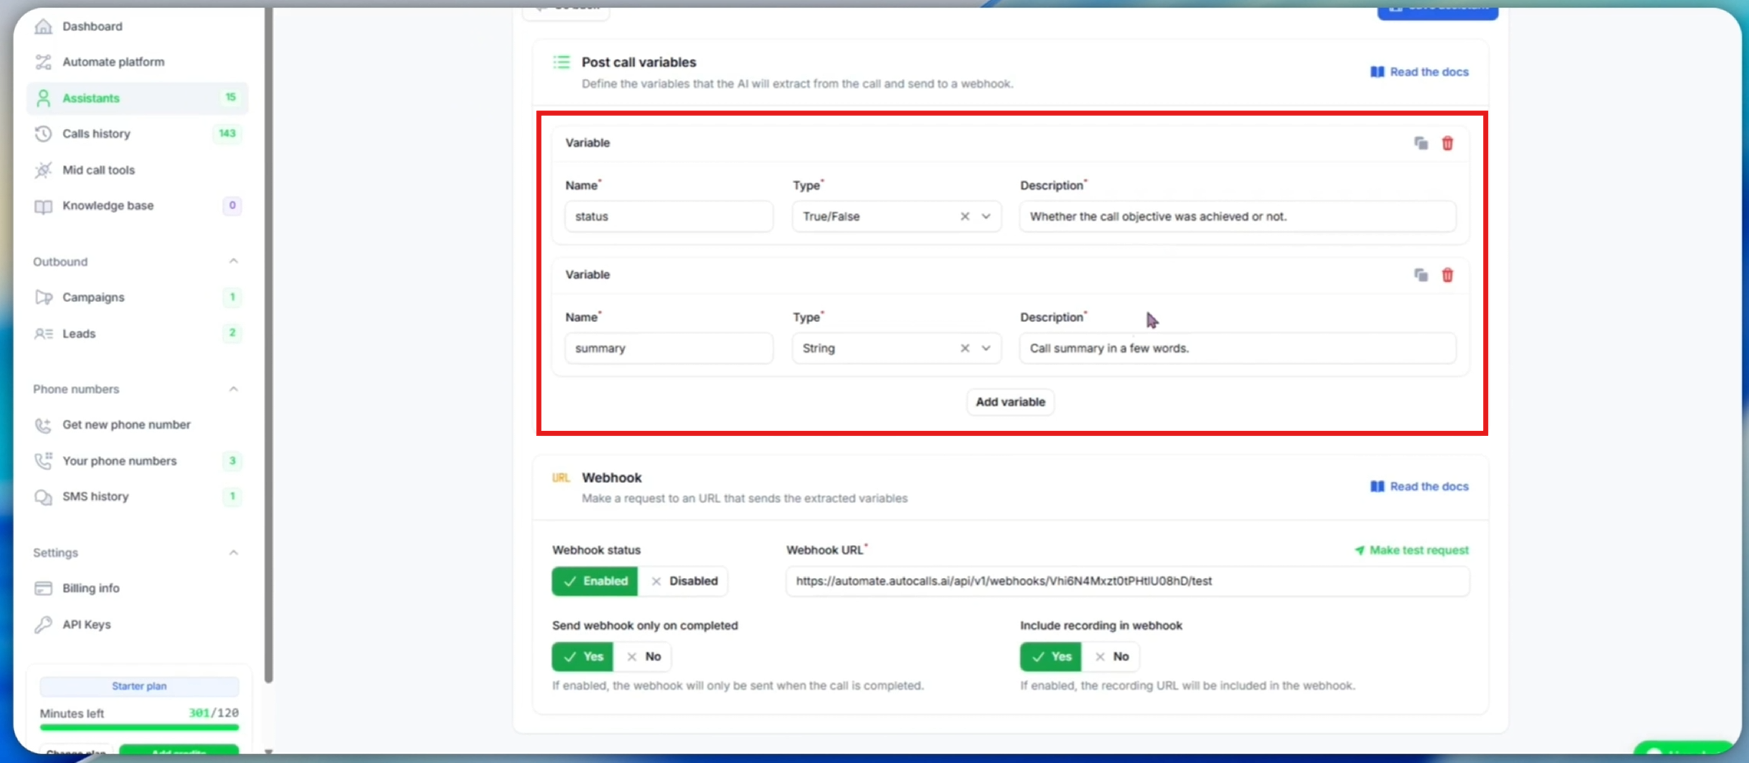
Step 3: Verify Assistant Variables
Before proceeding, make sure your assistant has the right variables configured:- Check post-call variables in your assistant’s “Post-call Actions” tab:
- status: Boolean (true/false) indicating if call objective was achieved
- summary: Text summary of the call conversation
- These variables are extracted by AI after each call
Adding New Post-Call Variables
If you add a new post-call variable after creating the automation:- Define the new variable in your assistant’s “Post-call Actions” tab and save
- Return to your automation and click “Load Data” again to refresh the available fields
- Re-evaluate an existing call if needed to extract the new variable from past calls
Step 4: Add Conditional Logic for Qualified Leads
We only want to add leads to Google Sheets when the call objective was achieved.- Click the ”+” sign to add a step
- Search for “Branch” in control flow
- Select Branch to create conditional logic
- Configure the branch condition:
- Select
statusvariable from call data - Choose “Boolean is true”
- This creates two paths: True (qualified) and False (not qualified)
- Select
Step 5: Create Google Sheets Integration
Now we’ll set up the Google Sheets action for qualified leads (True branch).- On the True branch, click the ”+” sign
- Search for “Google Sheets”
- Select “Insert Row” action
- Create a new Google Sheets connection:
- Authorize with your Google account
- Save the connection for future use
Step 6: Set Up Your Qualified Leads Spreadsheet
- Create a new Google Sheet named “successful calls” for example
-
Set up column headers:
- Column A:
phone_number - Column B:
summary - Add more columns for additional data as needed
- Column A:
Step 7: Configure Spreadsheet Selection
- Return to your automation
- Select your “successful calls” spreadsheet
- Select the correct sheet (usually “Sheet1”)
- Enable “First row contains headers”:
- This tells the automation about your column structure
- Headers should automatically load and display
Step 8: Map Call Data to Spreadsheet Columns
- Map the phone number:
- Click on the
phone_numberfield - Select “Phone Call Ended” data source
- Find and select the phone number from call data
- Click “Insert”
- Click on the
-
Map the call summary:
- Click on the
summaryfield - Navigate to “Post Call Variables”
- Select the
summaryvariable - Click “Insert”
- Click on the
-
Map any additional fields:
- Email from call variables
- Call date/time from call metadata
- Any custom variables you’ve defined
Step 9: Test and Verify
- Click “Test Step” to verify the integration
- Check for successful execution
- Go to your Google Sheet to confirm:
- New row was added with correct data
- All mapped fields populated properly
- Data formatting looks correct
Step 10: Publish and Monitor
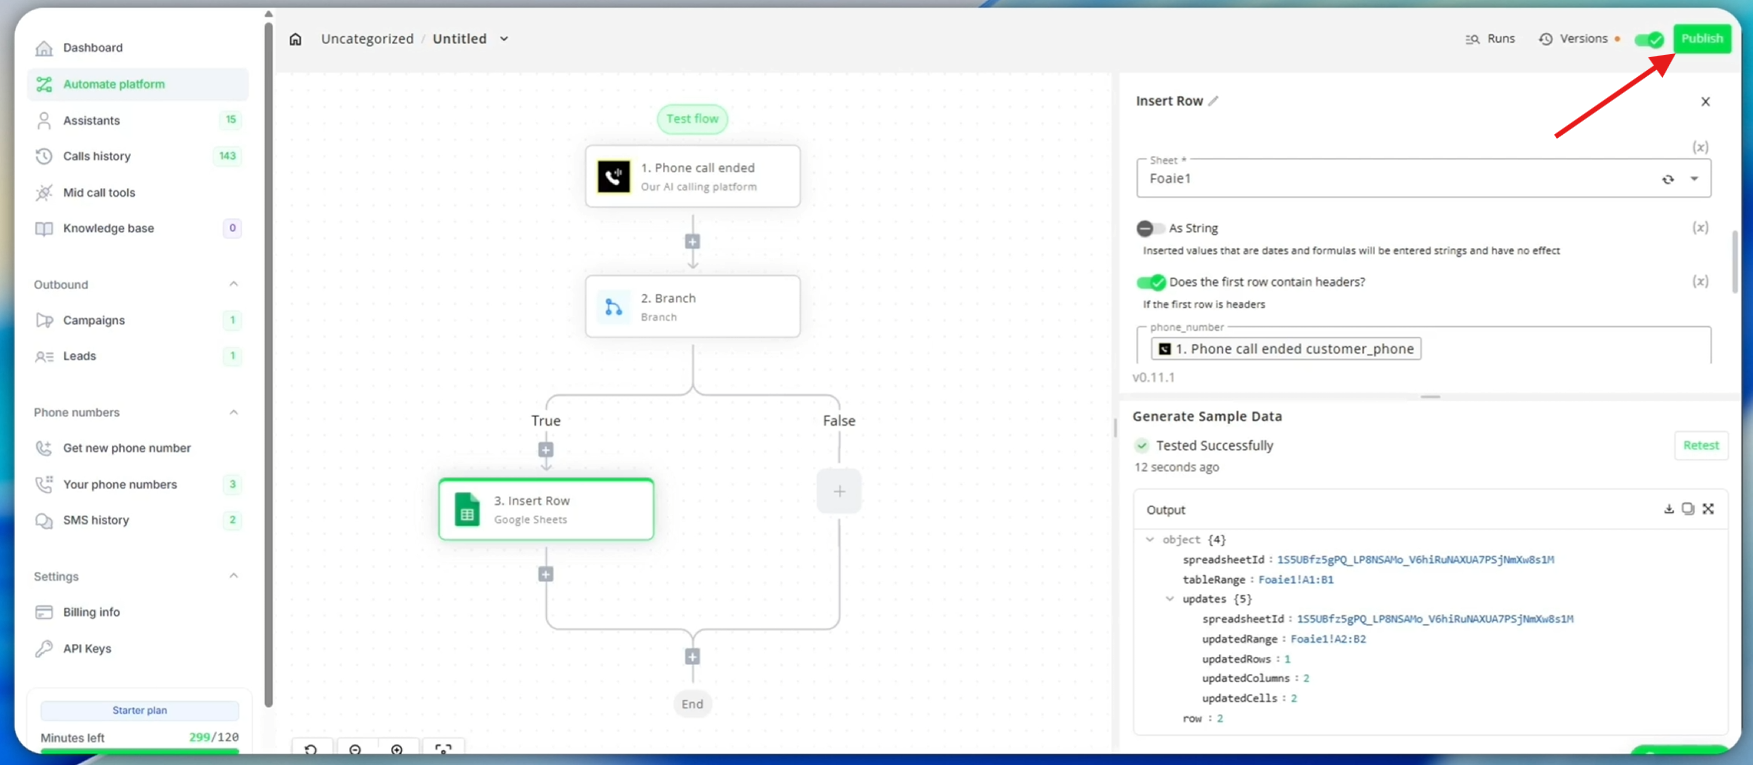
- Click “Publish” to activate your automation
- Your qualified leads tracking is now live
- Monitor automation performance:
- Check automation “Runs” for execution history
- Verify qualified leads are being added to your sheet
- Monitor for any failed executions
Troubleshooting
Common Issues
Leads not appearing in spreadsheet:- Verify Google Sheets connection is authorized
- Check that automation is published and active
- Confirm calls are triggering
status=true - Verify branch condition is configured correctly
- Check all field mappings in the automation
- Verify post-call variables are being extracted
- Confirm spreadsheet headers match automation fields
- Test with various call scenarios
Next Steps
Once your qualified leads automation is working:- Add lead scoring based on call quality
- Create follow-up automations for hot leads
- Integrate with email marketing platforms
- Set up analytics dashboards for conversion tracking
- Expand to multiple campaigns and lead sources