What You’ll Learn
- Setting up post-call webhook automation triggers
- Configuring conditional logic based on call success
- Mapping call data to SMS content
- Testing post-call automations with live calls
- Best practices for SMS follow-up messaging
Prerequisites
- Configured AI assistant with post-call variables
- SMS-enabled phone number in your platform
- Basic understanding of automation flows
- Access to call testing functionality
Step 1: Create Post-Call Automation Flow
We’ll start by creating an automation that triggers when a phone call ends.- Navigate to Automation Platform
- Create a new flow from scratch
- Search for your calling platform in the trigger section
- Select “Phone Call Ended” trigger
- This trigger activates when any call to your selected assistant completes
Step 2: Configure Assistant and Load Data
- Select the assistant you want to automate
- Each assistant can only have one “phone call ended” automation
- All calls to this assistant will go through this automation
- Click “Load Data” to set up the webhook and load sample call data
- This automatically configures the webhook on your assistant
- Sample data from your recent calls will be loaded for use in the next steps
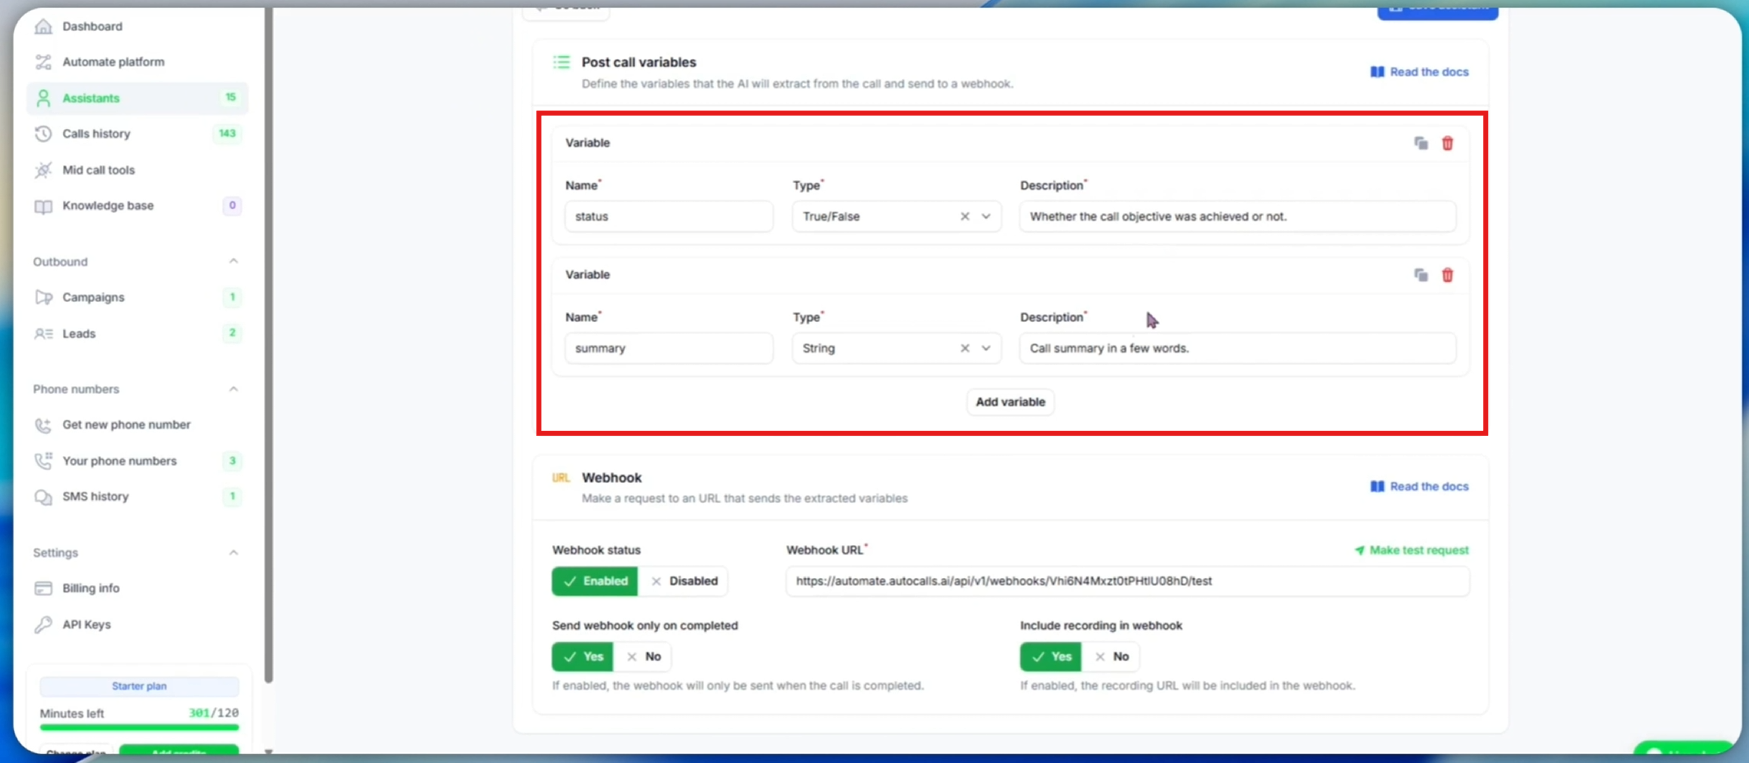
Step 3: Verify Assistant Variables
Before proceeding, make sure your assistant has the right variables configured:- Check post-call variables in your assistant’s Post-call Actions tab:
- status: Boolean (true/false) indicating if call objective was achieved
- summary: Text summary of the call conversation
- These variables are extracted by AI after each call
- You can add more variables to use in your SMS content (e.g.,
customer_name,appointment_date)
Adding New Post-Call Variables
If you add a new post-call variable after creating the automation:- Define the new variable in your assistant’s “Post-call Actions” tab and save
- Return to your automation and click “Load Data” again to refresh the available fields
- Re-evaluate an existing call if needed to extract the new variable from past calls
Step 4: Add Conditional Logic for Goal-Based SMS
We want to send SMS only when the call objective is achieved, so we need a decision branch in our automation.- Click the ”+” sign to add a new step
- Search for “Branch” in the control flow options
- Select the Branch component
- Configure the branch condition:
- A sidebar will appear for setting up the condition
- Search for the
statusvariable from your call data - Select the
statusvariable - Choose “Boolean is true” as the condition type
- This creates two paths: True (left) and False (right)
The
status variable is Boolean (true/false). After each call, this variable will be extracted and will be true if the call objective was achieved, otherwise false. The branch will execute the “True” path when the goal was achieved and the “False” path when it wasn’t.- True path (left): Actions for successful calls (objective achieved)
- False path (right): Actions for unsuccessful calls (objective not achieved)
Step 5: Configure SMS Action for Successful Calls
Now we’ll add the SMS action that triggers when the call objective is achieved.- On the “True” branch (successful calls), click the ”+” sign
- Search for your calling platform
- Select “Send SMS to Customer”
- Select an SMS-enabled phone number from your platform:
- Choose an existing number that you have in your platform
- This number will be the sender of your SMS messages
- Make sure the number has SMS capabilities enabled
Step 6: Map SMS Content and Recipient
Now we’ll configure who receives the SMS and what message they get.- Configure the SMS recipient:
- Click on “Customer Phone” input field
- A sidebar will open showing available data from the call
- Search for the variable that holds the phone number
- Select the phone number from your call data
- Click “Insert” to map the field
- Configure the SMS message content:
- Move to the text message field
- Use the
summaryvariable for personalized content - The
summaryis the post-call variable that contains AI-generated call summary - You can write custom text + dynamic summary
- Example: “Thank you for your time! Here’s a summary of our call: ”
The
summary variable is filled automatically after each call based on the conversation discussion and will be unique for each customer interaction.- Test the SMS action:
- Click “Test Step” to send a test SMS using your call data
- Verify successful delivery in the test results
- Check your phone for the actual SMS message
- Confirm the message content includes the call summary
Step 7: US Phone Numbers - Twilio Integration
Important for US phone numbers: If your SMS messages need to be sent to US phone numbers, you will need to use Twilio instead of our AI calling platform’s SMS feature. This requires A2P verification for compliance with US regulations.
Setting Up Twilio for US SMS
If you need to send SMS to US numbers, follow these steps:- Purchase a phone number from Twilio with SMS capabilities
- Complete A2P 10DLC registration in your Twilio account
- Replace the SMS action in your automation:
- Search for “Twilio” in the action search
- Select “Send SMS” from Twilio options
- Create new connection when prompted
- Complete Account SID and Auth Token from your Twilio dashboard
- Save the connection
- Configure Twilio SMS:
- Select your Twilio phone number
- Map customer phone number (same process as above)
- Configure message body (same process as with our platform)
- Test the step to verify delivery
Step 8: Publish and Activate Automation
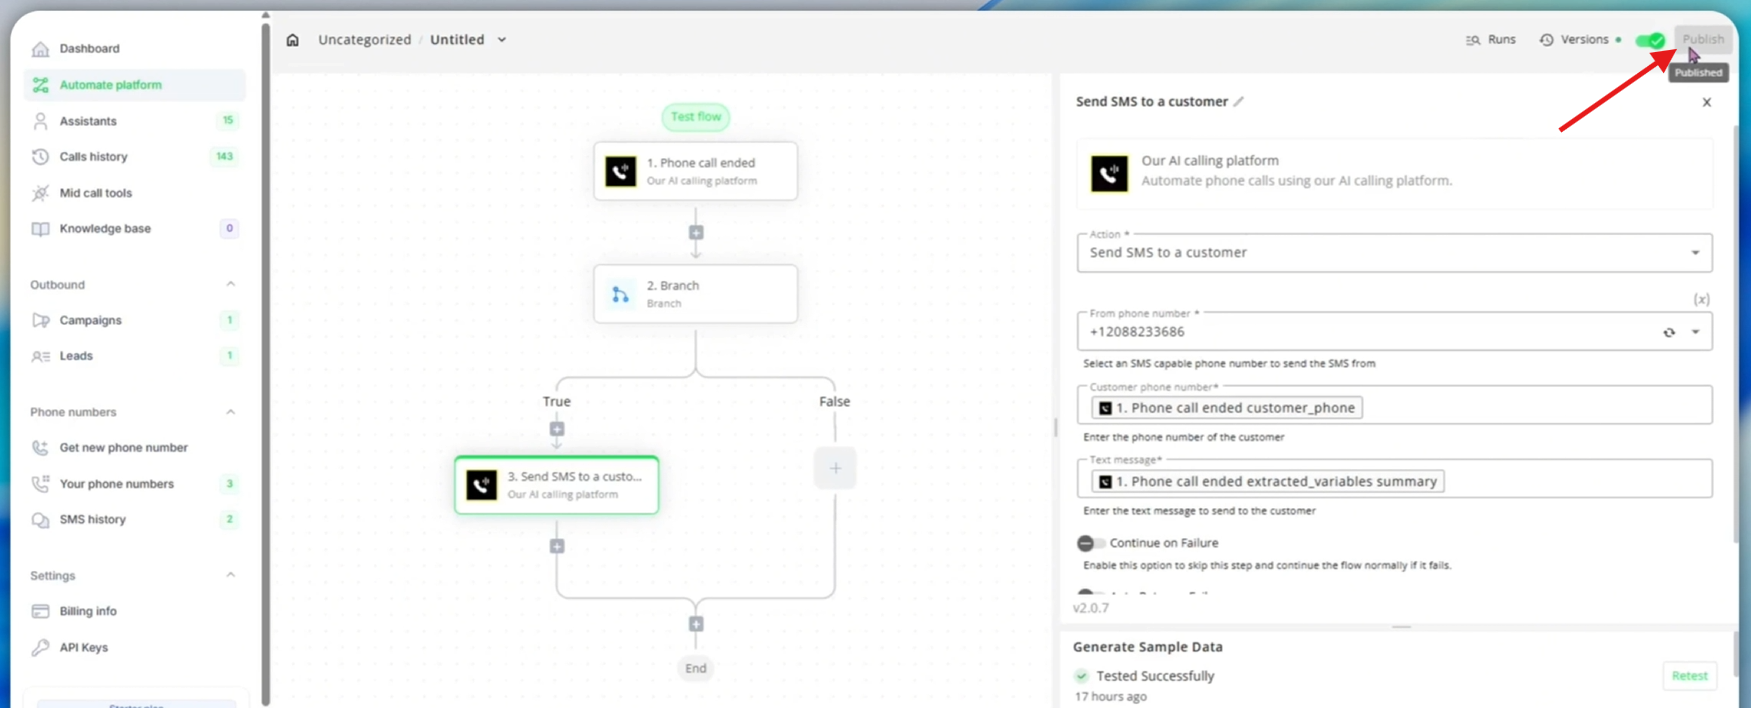
- Click “Publish” to activate your automation
- Your post-call SMS automation is now live and ready
- After each call with the selected assistant
- If the objective was achieved (
status= true) - The customer will automatically receive an SMS with the call summary
- Monitor automation performance:
- Click “Runs” to see execution history
- Verify SMS delivery for successful calls
- Monitor any failed executions
- Track which calls triggered SMS vs which didn’t
SMS Delivery Tracking
Monitor your SMS automation effectiveness:- Delivery rates: Track successful SMS delivery
- Response rates: Monitor customer engagement
- Opt-out handling: Respect customer preferences
Best Practices
Message Content
- Keep messages concise and valuable
- Personalize with call data when relevant
- Include clear next steps or contact information
Timing Considerations
- Send immediately after successful calls for best engagement
- Consider time zones for your customer base
- Avoid late-night messaging unless appropriate for your business
Troubleshooting
Common Issues
SMS not sending:- Verify phone number has SMS capabilities
- Check customer phone number format (+1234567890)
- Confirm SMS action is on the correct branch
- Ensure webhook is enabled in assistant settings
- Verify automation is published and active
- Check that calls are completing successfully
- Verify variable mapping in SMS content
- Check that post-call variables are being extracted
- Test with various call scenarios
Next Steps
Once your basic SMS automation is working:- Add email automation for additional follow-up
- Create different messages for different call outcomes
- Integrate with CRM systems to log communication
- Set up advanced analytics to track engagement
- A/B test different message templates for optimal results