What You’ll Learn
- Creating an AI assistant optimized for Google Sheets integration
- Setting up Google Sheets trigger for new row additions
- Configuring proper data mapping from spreadsheet to assistant
- Testing and deploying your live sync automation
- Best practices for spreadsheet formatting
Prerequisites
- Google account with Google Sheets access
- Phone number configured for outbound calls
- Basic understanding of spreadsheet structure
Step 1: Create Your AI Assistant
We’ll start by creating an AI assistant specifically configured for Google Sheets lead processing.
- Navigate to Assistants page and click “Assistants” in the sidebar
- Click “New Assistant” button
- Name your assistant - we’ll use “Test GoogleSheets”
- Complete the basic settings:
- Select a phone number for outbound calls
- Choose an appropriate voice
- Set your timezone
Step 2: Configure Call Variables for Spreadsheet Data
Call variables will map directly to columns in your Google Sheet, so plan your spreadsheet structure accordingly.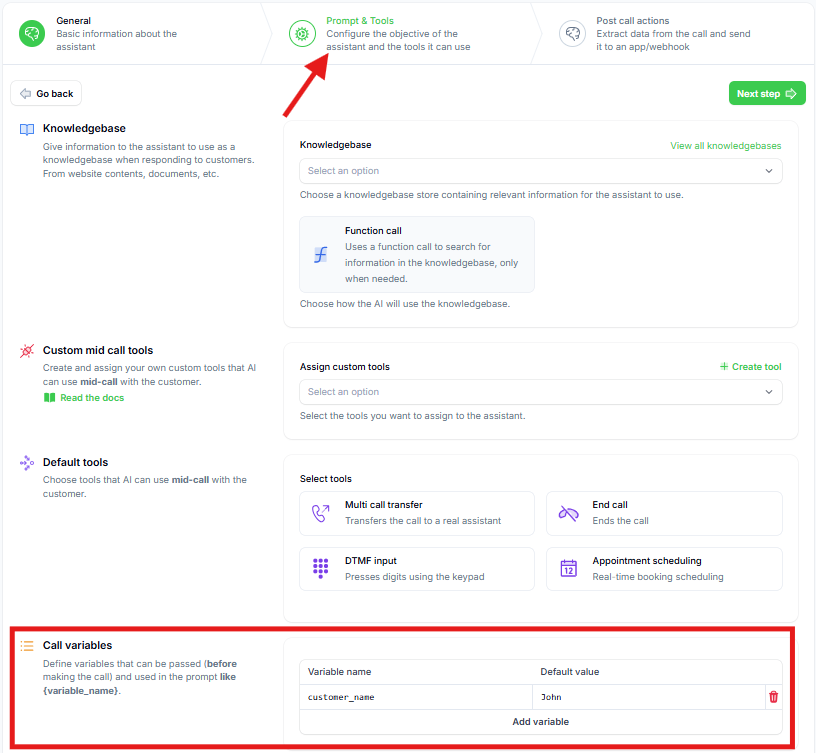
- Go to the “Prompts and Tools” tab (second tab)
- Locate the “Call Variables” section
-
Configure your call variables:
- You’ll see
customer_namewith default value “John” - Add
emailvariable with your email as default value for testing - Add any additional variables that match your spreadsheet columns
- You’ll see
-
Variables can be used in multiple ways:
- In the system prompt: “Hi
{customer_name}” - For mid-call tools: Personalized API calls
- For file imports: Bulk lead processing
- For automation platform: Dynamic data mapping
- In the system prompt: “Hi
Step 3: Create Campaign for Sheet Leads
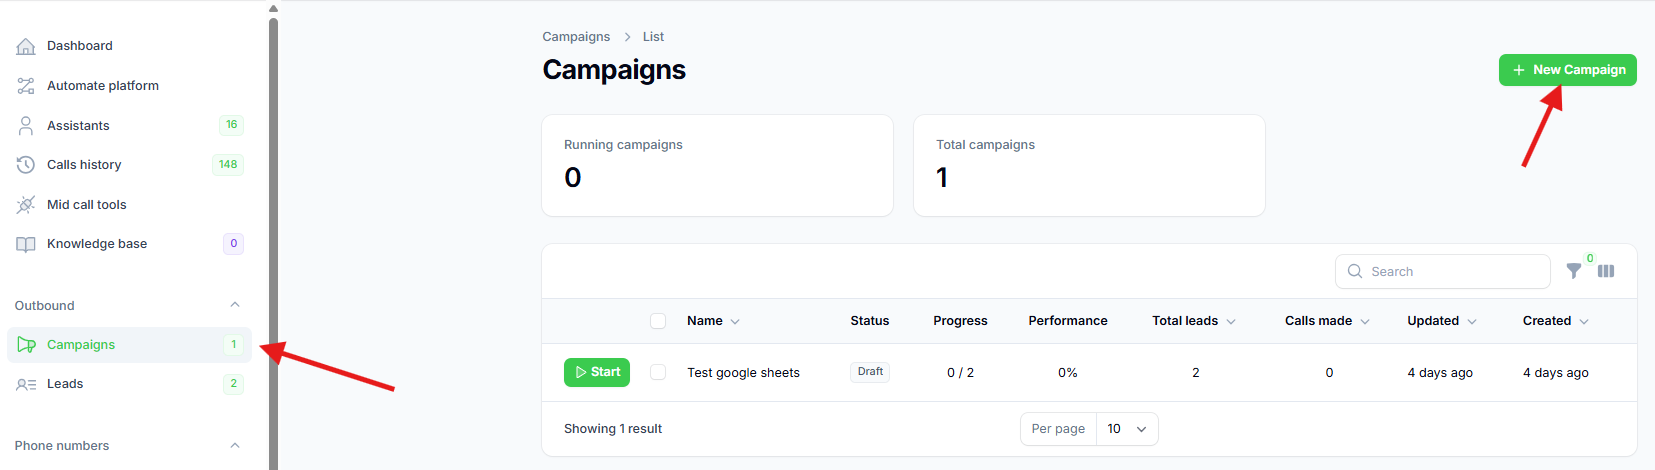
- Navigate to Campaigns page in the sidebar
- Click “New Campaign” button
-
Configure your campaign:
- Give it a descriptive name
- Select the assistant you just created
- Keep default retry settings (can be adjusted later)
- Click “Create” to save the campaign
Step 4: Set Up Google Sheets Automation
Now we’ll create the automation that monitors your Google Sheet for new leads.- Click “Automation Platform” in the sidebar
- Create a new flow from scratch
- Search for “Google Sheets” in the trigger search
- Select “New Row Added” trigger
- Create a new connection:
- Click “New Connection”
- Authorize with your Google account
- Click “Save” once connected
Step 5: Create and Configure Your Test Spreadsheet and add sample data
For this tutorial, we’ll create a properly formatted test spreadsheet.- Go to Google Sheets and create a new spreadsheet
- Name it “testnewleads” (or any descriptive name)
- Add a test lead in the first row:
- Phone number: Use international format (+1234567890)
- Customer name: Your name for testing
- Email: Your email address
- Save the spreadsheet - this data will be used for testing
Step 7: Configure the Automation Trigger
- Return to the automation platform
- Select your spreadsheet (“testnewleads”)
- Select the specific sheet (usually “Sheet1”)
- Click “Load Data” to fetch the sample lead
- Verify that you can see the lead data you just created
Step 8: Configure the Campaign Action
- Click the ”+” sign to add an action
- Search for your calling platform
- Select “Add Lead to Campaign”
- Select the campaign you created for this automation
Step 9: Map Spreadsheet Data to Assistant Variables
This step connects your spreadsheet columns to your assistant’s call variables.- Click on the “Phone Number” input field
- A sidebar will open showing available data from the trigger
- Search for and select the phone number from your spreadsheet
- Click “Insert” to map the field
- Map your call variables:
- customer_name: Select from spreadsheet data
- email: Select from spreadsheet data
- Map any additional variables you defined
Step 10: Test the Integration
- Click “Test Step” to verify the lead creation
- Check for success confirmation
- Navigate to your Leads page to confirm:
- The lead appears in your platform
- All variables are correctly populated
- Data matches your spreadsheet entry
Step 11: Publish and Monitor
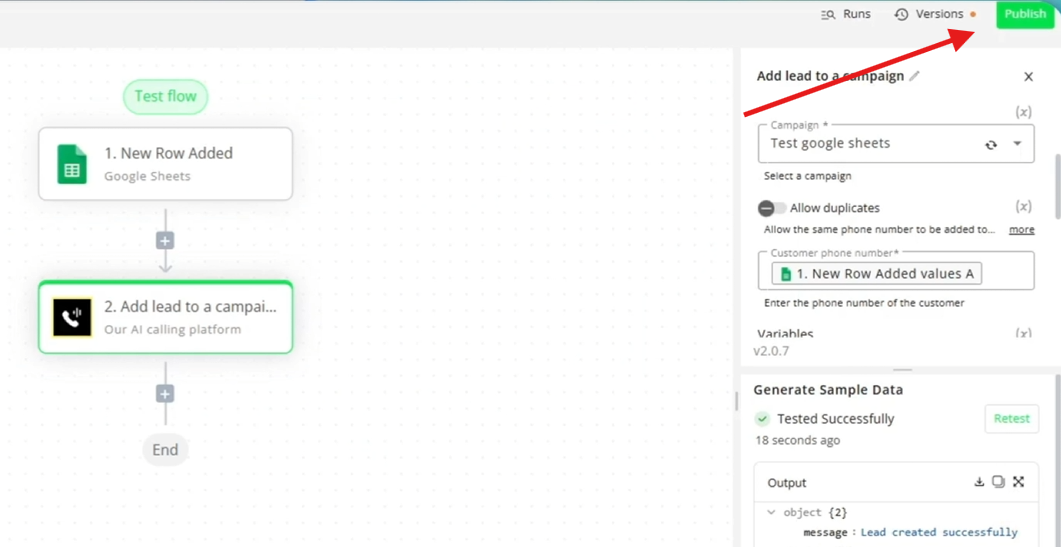
- Click “Publish” to activate your automation
- Your spreadsheet is now being monitored for new rows
- Test the live sync:
- Add new leads to your spreadsheet
- Check that they automatically appear in your platform
- Monitor the automation runs for any issues
- Monitor automation performance:
- Click “Runs” button in your automation
- Review each execution for success/failure
- Check timing and data accuracy
Best Practices
Spreadsheet Management
- Maintain consistent data format across all entries
- Keep phone numbers in international format consistently
- Avoid empty rows between data entries
Advanced Features
Multiple Variable Support
If your business needs more lead data:- Add columns to your spreadsheet (company_name, address, etc.)
- Define corresponding variables in your assistant
- Map the new fields in your automation
- Test with sample data before adding real leads
Troubleshooting
Common Issues
Leads not syncing:- Check Google Sheets connection authorization
- Verify spreadsheet permissions and sharing settings
- Ensure new rows contain data in all mapped columns
- Use international format: +1234567890
- Remove spaces, parentheses, and dashes
- Verify country code is included
- Confirm variable names match between assistant and spreadsheet
- Check that columns contain data
- Verify mapping configuration in automation
- Ensure automation is published and active
- Check that new rows are actually being added
- Verify Google Sheets trigger is properly configured
Next Steps
Once your Google Sheets integration is working:- Scale up with larger lead lists
- Add more variables for better personalization
- Integrate with other tools like CRM systems
- Set up follow-up automations for call results
- Monitor and optimize your conversion rates