Overview
The Web Widget allows website visitors to interact with your AI assistant directly through:- Voice conversations: Real-time voice calls in the browser
- Text chat: Messaging interface for text-based interactions
- Hybrid mode: Seamless switching between voice and chat
Accessing Widget Configuration
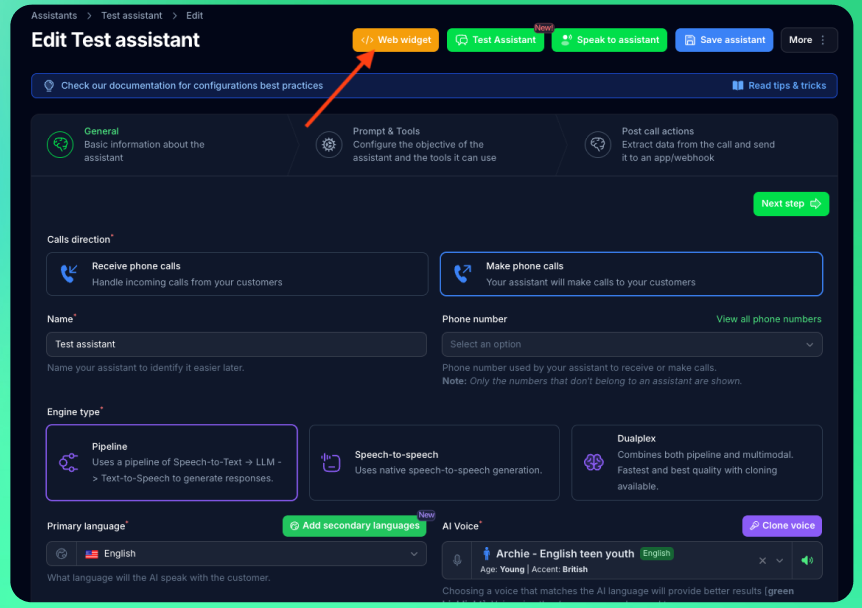
- Navigate to your assistant’s edit page
- Click the “Web widget” button (yellow/warning color)
- The widget configuration panel opens with live preview

Web Widget is a premium feature. Ensure your plan includes web widget access before configuration.
Widget Modes
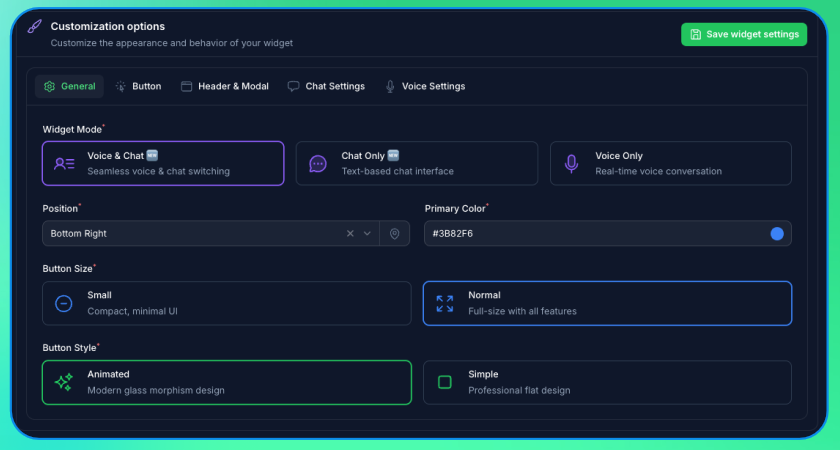
Choose how visitors interact with your assistant:Voice & Chat (Recommended)
Users can seamlessly switch between voice and text during conversations. Best for:- Maximum flexibility for users
- Accessibility (voice for mobile, chat for quiet environments)
- Complex interactions requiring both modes
Chat Only
Text-based messaging interface only. Best for:- Customer support and FAQs
- Environments where voice isn’t appropriate
- Lead capture and qualification forms
Voice Only
Real-time voice conversations only. Best for:- Phone-like experience on website
- Voice-first use cases
- Hands-free interactions
Configuration Options
General Settings

Text Customization
Customize all visible text to match your brand voice and language: Header:- Header Title (default: “AI Assistant”)
- Header Subtitle (default: “Ready to help you ✨”)
- Button Main Text (default: “Need help?”)
- Button Sub Text (default: “Chat with us”)
- Modal Title (default: “Ready to chat?”)
- Modal Description (default: “Click below to start your conversation”)
- Start Button Text (default: “Start Voice Chat”)
- Chat Placeholder (default: “Type your message…”)
- Send Button Label
- Connecting Text (default: “Connecting…”)
- Disconnect Text (default: “Disconnect”)
- Error Text (default: “Connection failed. Please try again.”)
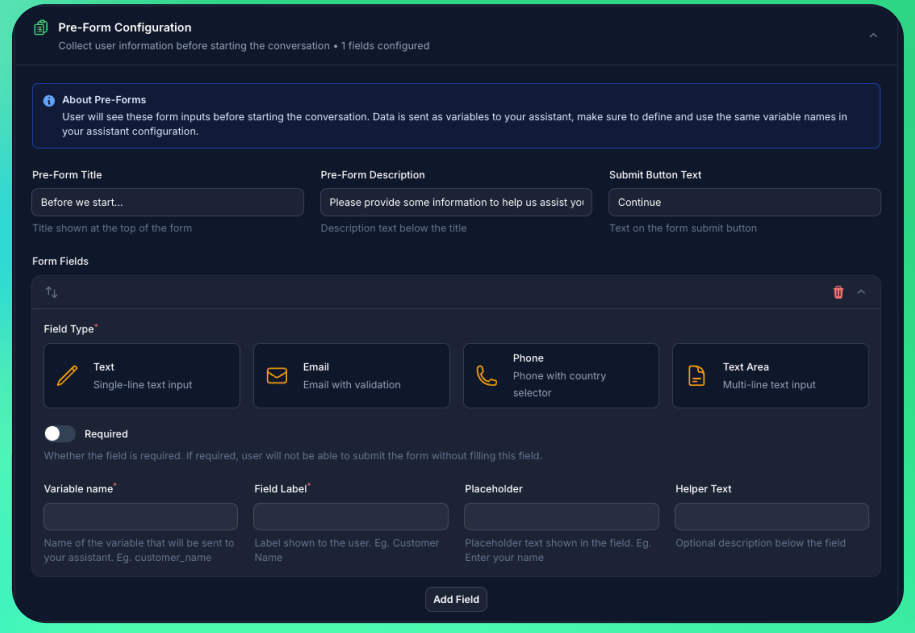
Pre-Chat Form

- Pre-form Title
- Pre-form Description
- Submit Button Text
- Variable Name: Internal variable name (maps to assistant variables)
- Field Label: Display label shown to users
- Field Type: Text, Email, Phone, or Textarea
- Required: Make field mandatory
- Placeholder: Placeholder text shown in the field
- Helper Text: Optional description below the field
Live Preview
The configuration panel includes a live preview showing exactly how your widget will appear:- Auto-updates: Preview updates as you change settings
- Real interaction: Test widget functionality in the preview
- Reset Data: Clear stored data to test first-time visitor experience
Installation
1. Save Configuration
After customizing your widget:- Click “Save widget settings” in the configuration panel
- Wait for confirmation notification
2. Get Embed Code
Copy the generated embed code from the “Embed Code” section.3. Add to Website
Paste the script tag before the closing</body> tag on your website:
4. Verify Installation
- Visit your website
- The widget button should appear in the configured position
- Click to test voice/chat functionality
- Check that pre-chat form appears (if configured)
Widget Behavior
First Visit
- Widget button appears in configured position
- Click opens modal/chat interface
- Pre-chat form displays (if configured)
- After form submission, conversation starts
Return Visits
- Previous conversation state may be restored
- Form data remembered (if visitor hasn’t cleared cookies)
- Seamless continuation of support experience
Conversation Tracking
All widget conversations appear in your Conversations page for review and analysis.Troubleshooting
For setup and configuration issues, see Web Widget Troubleshooting.Next Steps
- Test widget using the live preview
- Embed code on your website
- Monitor conversations in the Conversations page

